The Best Way to Fit a Cloth Diaper: A Step-by-Step Guide
Share
Cloth diapering is an eco-friendly and cost-effective alternative to disposable diapers, and has gained popularity among parents looking for environmentally friendly and budget-conscious alternatives to disposable diapers. With rising awareness of the impact of waste on our planet and the long-term cost savings that cloth diapers can offer, more families are making the switch.
However, while cloth diapers can be a fantastic choice, achieving the perfect fit is essential for both comfort and leak prevention. A well-fitted cloth diaper can keep your baby dry and happy, allowing them to move freely without irritation. In this guide, we will walk you through the essential steps to fit a cloth diaper properly, ensuring that both you and your little one can enjoy the many benefits of this sustainable diapering option.
Preparation: Choose the Right Size and prepare the diaper
Before fitting a cloth diaper, selecting the appropriate size is crucial. Cloth diapers come in a variety of sizes and styles, ranging from newborn to toddler. Make sure you choose the size that corresponds to your child's weight and age. Many cloth diapers, such as the Eco pocket by Kaayah, are adjustable, allowing them to grow with your baby.
Once you have selected the right size, it's time to prepare the diaper. If you're using pocket diapers, insert the absorbent pad into the pocket. For all-in-one diapers, ensure the absorbent layers are properly aligned. If you're using prefolds, fold them to the desired shape and size before placing them in the diaper cover.
1. Position the Diaper Correctly
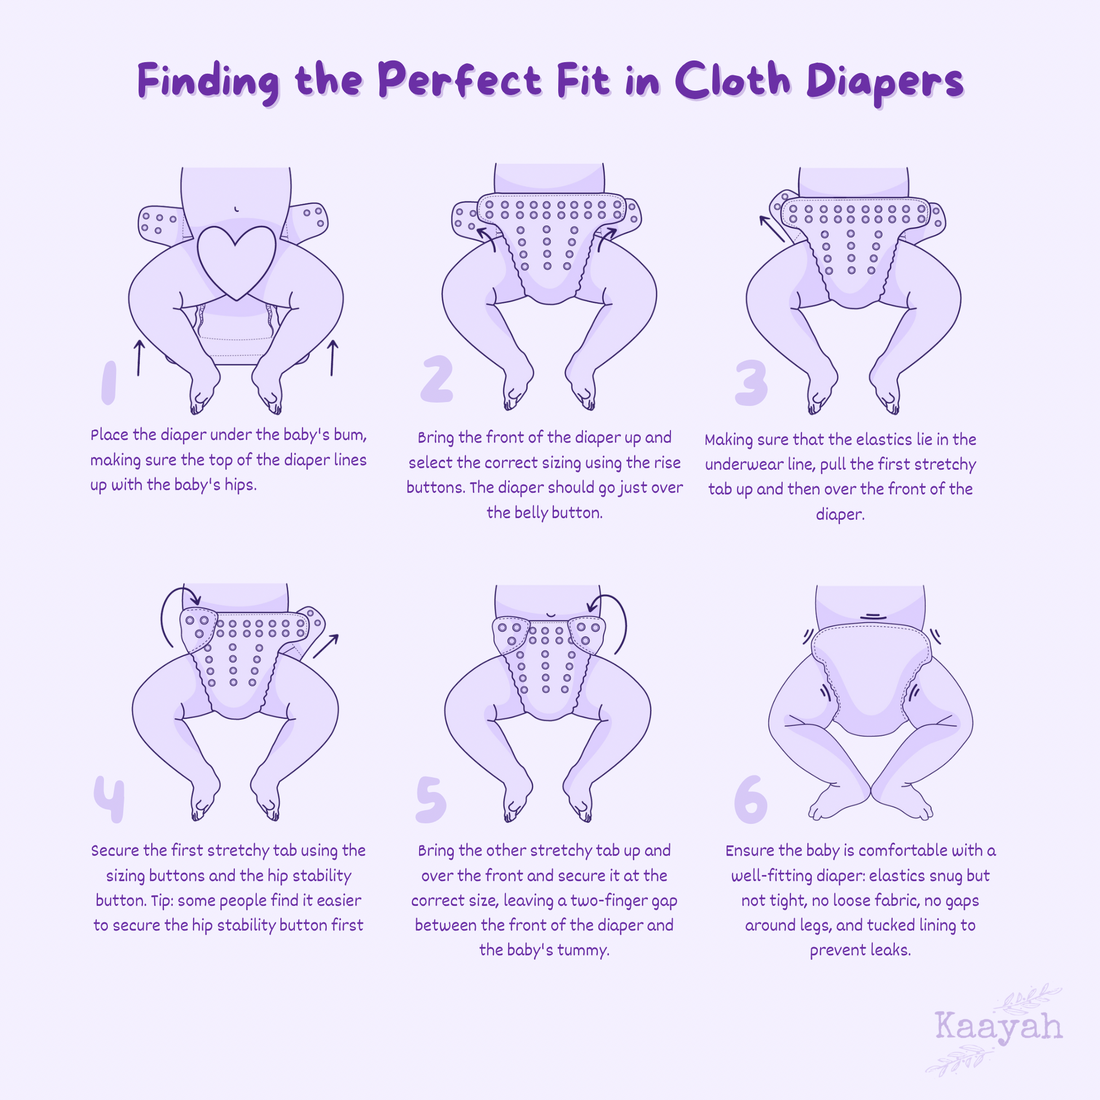
Lay your baby on a flat, safe surface and slide the diaper under their bottom. The back of the diaper should align with the top of their hip bones, just over their booty. Please note that cloth diapers sit much lower than disposable ones, almost like regular underwear. If the diaper has snaps or Velcro, ensure they are open so you can adjust them easily once the diaper is in place.
2. Bring the front of the diaper over and size correctly
Bring the front of the diaper up between your baby's legs, and over as high as it will go, even if it means that it now covers the belly button. Now you can adjust the length of the diaper using the rise poppers. Ideally you want the top of the diaper to sit right above the belly button after sizing. Once fastened the top will slide lower and sit in the perfect position just under the belly button. Make sure that the elastics are positioned in the underwear line, at the very top of the baby´s legs.
3. Secure the tabs
Fasten the diaper using the snaps or Velcro, ensuring it is snug but not too tight. You should be able to slide a finger comfortably between the diaper and your baby's skin. This fit prevents leaks while ensuring your baby can move comfortably. In order to achieve the perfect fit we love to use a little “up and over” technique which means that you should pull the tab up before bringing them over and fastening to the front of the diaper, this will bring the front of the diaper that Wes previously sitting over the baby´s belly button, to a lower position without creating unnecessary loose fabric at the bottom.
4. Check for Gaps and Adjust
Once the diaper is secured, check around the legs and waist for any gaps. A good fit will have the diaper snug against the skin without cutting in. Adjust the leg elastics and waist snaps if necessary to eliminate gaps. Remember that a proper fit is crucial for preventing leaks and ensuring your baby’s comfort.
5. Monitor and Change Regularly
Even with a perfect fit, cloth diapers need to be changed more frequently than disposables. Check the diaper regularly for wetness or soiling, and change immediately to keep your baby comfortable and to prevent diaper rash. Over time, you’ll become more familiar with your baby’s needs and develop a routine that works best.
By following these steps, you can ensure a comfortable and effective fit for your cloth diapers. Happy diapering!
